HOW TO PLAY PIANO IN 8 DAYS with VCD To get the video of this piano lesson,pay Ghc10 to our mobile money number 0244229584.You are entitle to 2 video every week that will be sent to your phone via whatsapp or click here to submit your email and the videos will be emailed to you.
All right reserved, No part of this publication may be reproduced, stored in a retrieval system, or transmitted, in any form or by any means without the prior written permission of the publisher, or be otherwise circulated in any form of binding or cover othe4r than in which it is published and without similar condition being imposed upon the subsequent purchaser This lesson could only be copied by our registered student This lesson explain daily lesson on how to become a pianist in 8 days For all enquiries and distributions please call +233542992386 Or mail instatpiano15@gmail.com or pianoschool1piano@gmail.com Website: www.pianoschoolgh.webs.com
DO YOU NEED A PRIVATE PIANO/GUITAR/VOICE TEACHER? click here Please call Rev Steve on 0542992386 Visit
Rev Steve chord on
INTRODUCTION I have been to many bookshop in this country and yet I cant found a piano book who is so practical and written by an African who really understand our styles and pattern or a basic book for beginners, it is highly disturbing and that is why I made up my mind to come out with this little but powerful book on how to play the piano in 8 days, as a beginner to guide you and keep you started to play the piano in just 8 days. I mean exercises you will do for 2 hours daily and you are on your way to play the piano. This book works for every levels,not only the beginner, it goes a long way to explain the practical playing of the piano with chords with a vcd to show you even if you don’t have a teacher, the vcd becomes your teacher because you will be seeing plainly how to play the chords, the names of the keys and progressions This is my token contribution to improve the standard of music in our country and to encourage everyone aspiring to be a pianist, this is not to neglect or to substitute for the need of having a piano teacher or all other teachers of the same art, but to complement their efforts and improve the standard of playing the piano. Buy one not just for yourself but also for someone you love. happy reading. Please rely more on the vcd CHAPTERS Chapter 1 Letter names on the piano Chapter 2. Fingering Chapter 3. Posture Chapter 4. Triads Chapter 5. Progressions
CHAPTER 1 LETTER NAMES ON THE PIANO Day 1
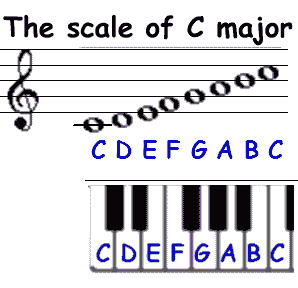
Welcome to "HOW TO PLAY PIANO IN 8 DAYS" You will need to have at least a small portable keyboard in front of you as you go through these lessons so that you can look at it and become familiar with it. Learning a keyboard is like typing. You need a typewriter keyboard in front of you to learn to type. The same is true of the piano. You need a piano keyboard in front of you to learn to play piano. A small Casio or Yamaha portable keyboard with built-in speakers would work just fine. As you first look at the piano keyboard, it looks like there are lots and lots of notes to learn. Not so! You only need to learn 12 notes. The shaded area on the keyboard above shows the 12 notes you will need to learn. Notes on a piano are grouped in sets of 12 notes. Each group has 7 white keys and 5 black keys. Look at the keyboard above and count the 7 white keys and 5 black keys in the shaded area. This is one group. This group is repeated over and over, up the keyboard and down the keyboard. Each group starts with a "C" note. See the note labeled "C" above? On any keyboard, "C" is always the first white key that is to the left of two black keys. When you first sit down at a piano keyboard, it can be a bit daunting. In front of you, there are 88 keys. Some are white, some are black. Whenever you are beginning something new, it is helpful to have a starting point. The starting point for learning to play the piano is a single note, Middle C. In this lesson, I'm going to take you from playing that simple note to playing a short chord progression. Don't worry if you don't know what a chord progression is right now, I will explain it a little bit later. For now, sit down at your piano and find Middle C. The video will show you where it is at. From middle C, I am going to show you how to play a complete C Major Scale. The C Major Scale is an easy one because it consists entirely of white keys. So, let's just play the white keys in order, starting at Middle C. The note directly to the right of Middle C is a D. As we continue moving to the right we play E, F, G, A, B and then finally return to C. That last C is an octave higher than Middle C. This collection of notes is the C Major Scale. The scale doesn't need to begin on middle C, it can start and end on any C on the keyboard. Now that you know a scale, you have an important building block to music. Scales are used to create melodies and to construct chords. A chord is a collection of three or more notes, all played simultaneously. Go back to Middle C and play it. From there skip a note and play the E, and then skip another note and play the G. Those three notes form a chord known as a triad, which simply means that there are three notes in it. Now that you know the notes of the C chord, play them all at once. Please refer back to the video
CHAPTER 2 FINGERING (DAY2)
What Is Piano Fingering?
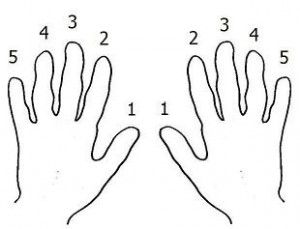
Piano fingering refers to finger placement on the piano keyboard, and the hand techniques used to play the piano. Fingered piano music marks each note with a number that corresponds to one of the five fingers. Reading Fingered Piano Music You will see numbers 1-5 written above or below notes in scales and songs. These numbers correspond to your five fingers, and tell you which finger presses which key. Finger numbering for both hands goes as follows:
Thumb: 1 Index Finger: 2 Middle Finger: 3 Ring Finger: 4 Pinky Finger: 5
When you begin playing with your left hand, you’ll notice that the fingering is often the same for both hands. Look at picture #2: The same fingers play the same notes in both triad scales, but the numbers are inverted. Fingered Practice Scales Good fingering is a valuable skill to have as a pianist. When you practice piano fingering, you’re enabling your fingers to execute new techniques, master awkward positions, and exercise speed and flexibility. Practicing fingering may seem tedious at first, but stick with it; your fingers will adjust quickly.
CHAPTER 3 POSTURE Find the Right Piano Bench Adjustable piano benches are a great option; especially for growing children, those sharing a piano, and those still getting comfortable at the keyboard. Traditional piano benches are not one-size-fits-all – you may have to tweak your bench in order to achieve proper piano posture. Tip: Adjustable benches can be found in a surprising array of styles: Adjust, and Repeat! If you’ve seen live piano music, you’ve probably also seen a few pianists take their merry time adjusting the piano bench – some quite meticulously. This is perfectly acceptable, so don’t feel self-conscious if you find yourself having to do so at your piano recital. You want to be comfortable, flexible, and stable: 1. Feet should be able to touch floor completely. If this is impossible or causes you to sit too low, place a sturdy object (from a simple footstool, to one of the fancier pedal platforms) under your feet instead. During play, your feet should provide more stability than the piano bench, so don’t let them wander too far in any direction. 2. Only sit on the front half of the piano bench. With your feet in the picture, your hips are no longer your center of gravity – your back is free to flex back and forth, and your torso can provide momentum for your upper body during strong dynamics and long octave spans. 3. Keep knees just under the keyboard. Avoid sitting at the piano like you would at a work desk; the keyboard may cover your knees, but your thighs are not meant to be underneath the instrument. 4. Find the right height at the keys. Sitting too high in front of the piano can cause pain in the upper back and neck; sitting to low makes for poor playing positions and a reduced view of the keyboard. Your height must allow you to touch the keys with your forearms parallel to the floor. Thighs are nearly parallel; it’s ok for knees to be slightly lower than your hips. If you need to add height, sit on a firm pillow or evenly-stacked blankets or bath towels.
Sheet music should be kept at eye-level. Music wouldn't be very interesting with just one chord, so I'm going to show you two other chords that can also be played with just the white keys. Let's start with an C chord. You remember where the C key is right? Good, hit the C key now and follow the same pattern we did to create the C chord. From C, skip a note to E, then skip another to G. Play them all together and you have an C chord.
If you play those three notes in order, you'll find they have a choppy sound to them. We can smooth that sound out using what are called chord inversions. Play a C chord. Now, keeping your first finger on the C, move the other two and play an F note and an A note. Take a look at the notes you have just played. C, F, A. Remember an F chord is made up of the notes F, A, and C. What you just played is an F chord with the C on the bottom instead of the top. Moving the notes around in this manor is called inverting the chord. Another way to invert a chord is to take the root note and put it on top. If we do that to the G chord, we end up with the notes D, B, G. Play that inversion of the G chord from the F inversion that I just showed you. Now when you play all three chords together it sounds much more smooth and melodic because your hands aren't jumping around the keyboard as much. It is also slightly easier to play. Please refer to the vcd But playing the piano is more than just your right hand. Now I am going to show you what to do with your left hand. As you play a chord in your right hand, play its root note with your left. The root note is simply the note that the chord is named after. C for a C chord, F for an F chord, G for a G chord, etc. Play a C note with your left hand and simultaneously play a C chord with your right. Now an F note with your left hand and F chord with your right. G note with your left hand, G chord with your right. When we put chords in an order like this, we are creating a musical phrase. This particular type of phrase is called a chord progression, because we are progressing through a serious of chords. C-F-G-C is what we call a 1-4-5 progression. Please refer to the video CHAPTER 5 PROGRESSIONS (DAY 4 -8) In the last lesson I told you that I would explain what I meant by a 1-4-5 progression. In order to do that let's backtrack a little to when we learned the C major scale. In learning the scale, we gave the notes names. The notes can also be numbered. The first note of a any scale is its root. In our case, the first note is C. If we count from C we'll get to seven when we get to the B note. The scale repeats itself at 8, which is the same note as the root, but an octave higher than where we first played it. Chord progressions are given as numbers so that it is easier to transfer them into any scale. Our 1-4-5 progression is made of the chords based on the first note, the fourth note, and the fifth note of our C Major scale. Those notes are C, F, and G. Chord progressions are normally given using roman numerals and that is how they will be represented for the remainder of the lessons. Now that you know what our I-IV-V progression is and how to play it, I am going to teach you a simple song. Going as slowly as you'd like play a C chord twice, followed by an F chord, the C chord twice again, followed by a G chord, and finished with a single C chord. Play around with that set of chords for a little bit. You can add variations, such as playing the left hand note twice instead of once before moving on to the next chord, or playing each individual note of the chord separately instead of all at once. When you feel comfortable with the song you can begin to experiment with simple melodies. You may be wondering how one even begins to experiment with melodies. We've all heard toddlers pounding away at toy pianos and making horrible noises; how can you be sure what you play will be pleasing to the ears. The truth is, I've already given you the secret. The notes in a scale automatically complement each other, and the notes of a chord automatically sound well with that chord. Play the song again. This time use your left hand to play the root as before, but with your right hand instead of playing the chord or playing each individual note of the chord in order, play the notes of the chord in any order that appeals to you. When you find a pattern, or melody, that you like, continue through the chord progression and play that pattern of notes with the notes that make up the chord you are playing.
In just a few short minutes you have went from looking at a piano keyboard and wondering where you start, to learning where Middle C is, the C Major scale, a few chords, a chord progression, and finally a simple song. As you learn more scales and techniques you will be able to expand on what you've learned and create more complex music. So, play around with what you have learned today. Get comfortable moving between the chords that I have taught you so far and then come back and see what I have in store for you in the next series 2 of HOW TO PLAY PIANO IN 8 DAYS! Please for more information you can write me to instantpiano15@gmail.com or call 0542992386 or visit my website www.pianoschoolgh.webs.com
|


.jpg?timestamp=1380529923852)
.jpg?timestamp=1380530015273)
